
It looks pretty harmless, right? I mean, it's just a randomly shaped biscuit with a cashew nut and a healthy glaze of egg.
Well. When I was younger, cashew nut cookies were the enemy. Partly because mum put cloves in hers (which I almost always bit into) but namely because they were a pain in the ass to make. Why were they a pain in the ass to make?
Because THIS is how mum shapes her cashew nut biscuits:

And why were they shaped like this?? To mimic cashew fruits, of course...

Sigh.
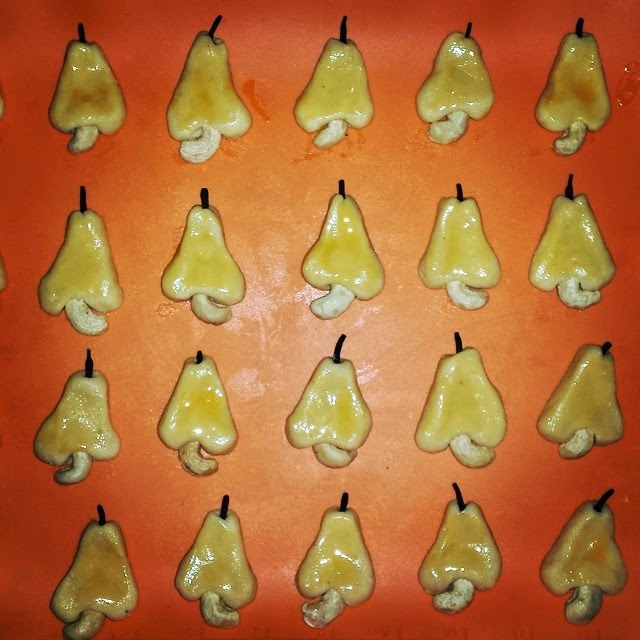
To give you a rough idea of how long it takes to shape the cookies, this tray you see below (partly cropped, I got 28 cookies per tray, I think) took me at least TWENTY MINUTES to shape. Just shape. Glaze not included.
There are so many things to bear in mind while making these cookies.
- Cashew nut size - you want to use bigger pieces so that there's enough of it anchored in the cookie so that it won't fall out but at the same time, you want at least half of the nut sticking out for aesthetic purposes.
- On that note, this means you have to be extra careful when splitting your cashew nuts. I can't tell you the number of halves I've had to relegate to the cashew meal pile.
- Cookie proportion - you need the top of the cookie to be noticeably narrower from the bottom so that when the cookie expands in the oven, you stil have a pear shape.
- While the cashew fruit has a round bottom, I prefer the W shaped bottom, the way my mum does it. It just looks nicer than having a wonky looking triangle after baking. As you'll see in my top photo, that cookie is a bit of a fail in this respect - the bottom bit is looking quite rounded because I didn't make the W pronounced enough.
- Cookie thickness - you want the cookies to be fairly thick at the bottom so that the cashew nut will stay in place when you pick the cookie up.
Cashew Nut Cookies
230g butter
150g caster sugar
360g flour
150g cashew nuts, ground to a fine meal
1 tsp vanilla
1 egg yolk
Extra egg yolks, for glazing
Cashew nuts, halved
Cloves
Method:
- Preheat the oven at 160 degrees.
- Cream butter and sugar until smooth.
- Add flour and ground cashew nuts. Mix until well incorporated.
- Stir in egg yolk and vanilla.
- Shape the cookie (suggestions on how to do this in the notes section)
- Insert a cashew nut at the bottom and a clove at the top of the cookie, making sure that they are well-enclosed in the batter.
- Glaze the completed cookies with egg yolk.
- Bake for approx 20 mins.
- Work quickly, using your fingers to shape the cookies.
- One strategy I use is to take some batter, roll it in a ball then mould it, using my finger as a guide. From there, I make one end wider than the other so that it goes from looking rectangular to pear-shaped.
- Another way I shape the cookies to form a tear drop/rounded triangle shape.
- I put a little dent in the middle of the bottom (wide end), where the cashew nut will go. The batter will mould around the cashew half, giving you a w-shape.
- In any case, make sure that your cookies are fairly "tall" as they will expand on cooking. Making your cookies long will ensure that you don't get blobby cookies.
- Also, you'll need to make sure that the top of the cookie is significantly narrow-er than the bottom so that you maintain a pear shape when the cookie is baked.
- For a bit of artistic flair, I also sometimes slant my cookies so that it looks a little lopsided. Just like how fruits in real life aren't always perfect looking ;)
No comments:
Post a Comment
Thanks for taking the time to comment on my little corner of the blogosphere. I will endeavour to reply each and every comment :)